


Tactics 101 088: The Ambush, Part 1 – Fundamentals
THE AMBUSH
THE FUNDAMENTALS
 “An enemy may be surprised, which implies that he is thrown off balance. This is the best method of defeating him, for it is so economical, one man taking on to himself the strength of many. Surprise may be considered under two main headings: surprise effected by doing something that the enemy does not expect, and surprise effected by doing something that the enemy cannot counter. The first may be denoted as moral surprise, the second as material.â€

Major-General J.F.C Fuller
{default}LAST MONTH
In our last article, we completed our discussion on operational art. In our two articles, we focused on answering the “why†and “what†of operational art.  Our major goal was to stress that there must be a level of war which ties the strategic and tactical levels of war. As our summary last month so eloquently stated: Operational Art allows the commander and staff to visualize, plan, and execute large scale military actions over time and space. It acknowledges that victory will not likely emanate from a single event and that we need shouldn’t engage the enemy everywhere we find him. Operational art provides us with a disciplined approach for planning these large scale missions. It prevents us from blindly wandering from one tactical event to another in the hopes of ‘finding’ victory or from succumbing to tactical hyperactivity—chasing every engagement as if all are decisive.
THIS MONTH
One of areas, we have wanted to address for sometime is the ambush. It is an attack which has been executed throughout history. Within the ambush there is much to talk about. During the next couple articles, we will address both the art and science of conducting an ambush.
Our first article will provide the foundation for the next article. In this foundation, we will answer the following: 1) What is the definition of an ambush? 2) Why do you conduct ambushes? 3) What is the terminology of the ambush 4) What are the critical actions of an ambush? 5) What are the fundamentals of conducting an ambush? 6) What are the categories of ambushes? 7) What are the types of ambushes? 8) What kinds of ambush formations can a commander utilize in the conduct of an ambush?
What is an ambush?
Hey, we always start with a definition, so let’s begin. An ambush is a surprise attack by fire from concealed positions on a moving or temporarily halted enemy. Depending on the tactical situation and objective; an ambush could also include follow-on maneuver in which the ambush force assaults the enemy in order to destroy his forces. An ambush is clearly enemy focused with no intent to seize or control terrain. This is a pretty simple definition. However, achieving success in the ambush is a far more difficult proposition. We will address actions which will aid in increasing your ability to achieve this success later.
Why Conduct an Ambush?
There are a multitude of reasons on why you may want to conduct an ambush. Let’s address some of these below:
- To harass an enemy and his ability to conduct current or future operations.
- To destroy a particular type of vehicle or vehicles. These may be critical to the enemy’s operations or may assist you in achieving your future mission.
- To capture a particular type of vehicle or vehicles.
- To disrupt the timeline of your opponent.
- To psychologically damage your foe.
- To demoralize your enemy.
- To deceive the enemy as to your intentions.
- To focus the enemy’s attention so you might conduct decisive operations in another location.
- To deny the enemy control of a piece of terrain.
- To deny the enemy the use of a particular route of maneuver.
- To kill a particular person or persons.
- To capture a particular person or persons.
Ambush vs Raid
It is not uncommon for many to confuse an ambush with a raid. There are some similarities within the two missions. However, there are two significant differences in the two. These differences relate to time and location. In regards to time, the attacker will set the time of attack in a raid. He dictates the initial action. In an ambush, the attacker must wait for the target to get into the location before he initiates action. Thus, the attacker does not set the time of attack in an ambush. In regards to location, the attacker sets the location for the conduct of the ambush.  Vice versa, in a raid, the attacker must maneuver to the target’s location. Thus, the target dictates the location in a raid.
The Terminology of the Ambush
Some of the Terminology of the Ambush
To assist in your understanding of the ambush, let’s address some of the terminology tied to the mission.
Ambush Site – This is the location where you will conduct the ambush. This includes all the terrain occupied by the attacker in the execution of the ambush.
Kill Zone – Within the ambush site, this is the location where you will fire your weapons in order to achieve your purpose.  In selecting a kill zone, you want terrain in which obviously the enemy is going to enter; it has terrain which can channelize the enemy; and is large enough so that the ambush force can destroy numerous enemy vehicles.
It’s All About Selecting a Good Kill Zone
Objective Rally Point (ORP) – This is a location the force will occupy prior to maneuvering to the ambush site. In determining a location for an ORP, you want to select an area which the force can’t be seen or heard from the ambush site and is out of enemy small arms range. Once in the ORP, the force will recon the ambush site, issue final changes to the plan, and conduct final preparations for the mission. Once the unit completes the ambush, it will also utilize an ORP to assemble all forces prior to executing its’ complete withdrawal.
Assault Element – It is the assault element which executes the ambush. This execution could take the form of firing direct fire into the kill zone, assaulting the enemy once it maneuvers into the kill zone, or a combination of both. If an infantry rifle platoon has the mission to conduct the conduct; then a rifle squad will normally be assigned as the assault element. Because of the importance of the assault element, the senior leader on the ground will generally position themselves with the assault element. In the above example, the rifle platoon leader would be with the assault element.
Support Element – The support element sets the conditions for success for the assault element. Its’ chief task is to fix enemy elements once they maneuver into the kill zone. In other words, if the enemy attempts (as they should) to maneuver out of the kill zone, they will place fires on the enemy to keep them into the kill zone. These fires are normally of the direct fire variety, but can also be called in, indirect fires. In our example, you would normally use your weapons squad (if organized) as the support element. The platoon sergeant would be positioned with them.
Security Element – A critical, but sometimes overlooked part of the ambush force is the security element. The security element can assume various roles based the tactical situation. These include: 1) Providing protection for the assault and support elements while they prepare and execute the ambush. 2) Securing the ORP. This comes into effect if the force will maneuver back to that location. 3) Recon and secure the force’s withdrawal route. 4) Be available to support the assault or support forces if the tactical situation dictates. In our above example, a rifle squad would assume the role of the security force. That squad leader would be in charge of that element.
Near Ambush – In a near ambush, the assault element is placed very close to the kill zone which they will fire into. This distance is normally 50 meters or less. Terrain in which you would conduct a near ambush is fairly obvious. This could include urban environments, wooded areas, etc…. – Really any terrain in which your fields of fire are very constrained.
Far Ambush – In a far ambush, the assault element is firing into the kill zone at a far greater distance. If terrain is open, then your fields of fire will be extended. Of course, the challenge in a far ambush is finding the cover to place your assault element so they won’t be compromised or threatened.
The Critical Actions of an Ambush
We will delve into this in more detail next month, but let’s briefly address the critical actions of an ambush.
1)   Tactical Maneuver to the ORP –The first step is getting to the ORP. Getting there means being stealthy and not physically and mentally draining the unit before it executes the ambush.
2)   Establish Security – Security is two-fold. First, security must be established in the ORP. Second, a security force must be deployed near the ambush site so the force can execute the next two actions.
3)   Recon the Ambush Site – A recon (of some sort) of the ambush site has probably already been completed.   However, this recon may have been by satellite, UAV, or a recon unit and conducted hours or even days earlier.  The force executing the ambush must conduct its’ own recon at the site. As in everything in tactics, nothing takes the place of walking the ground in which you will conduct operations.
4)   Prepare the Ambush Site – The recon should have finalized the plan and now it is time for prep. This prep will likely constitute several actions. These could include emplacing obstacles in and around the kill zone, preparing positions for the ambush forces, rehearsing critical actions and time-lines in preparation for the ambush.
5)   Execute the Ambush – All of the other actions lead to the execution of the ambush. We will discuss execution in far greater detail next month.
6)   Withdraw – The operation is not complete or can be considered a success until the ambush force withdraws safely from the ambush site. As with most operations, the withdrawal can be the most challenging piece for a unit. As with the execution, we will address the withdrawal from the ambush site in our next article.
Fundamentals of an Ambush
An Ambush Waiting to Happen
Every mission has a set of basic fundamentals, which if adhered to will greatly assist in mission accomplishment – the ambush is no different. Below we will highlight the critical fundamentals which apply to the conduct of an ambush.
- The obvious most important fundamental of the ambush is surprise. Surprise and ambush are linked together. This surprise differentiates the ambush from most other offensive operations. Surprise should equate to a more lethal kill zone for the ambush force and less risk.
- In most ambushes, the focus is on destroying the enemy. This leads us to the next fundamental which is coordinated fires. These fires are primarily direct fires, but can include indirect as well. Coordinated fires mean several things. First, fires are initiated at the correct time and conclude at the correct time. Second, fires are delivered at the precise location you want them. This location is not only on the target itself, but in areas that channelize the target into a location or force them to stay in a location.
- As in any operation, discipline usually means the difference between success and failure. Discipline in an ambush is exhibited in numerous ways. These include: 1) As stated above, firing weapons when and where you are supposed to. 2) Remaining quiet and still in the ambush location as to not give away your surprise.
- The combination of surprise and coordinated fires are two key contributors in creating shock effect. An ambush should paralyze the enemy mentally and physically from its beginning. This shock effect sets the conditions for success.
- The one constant in the above fundamentals is quality leadership. Because of the nature of an ambush this means quality small unit leadership. Small unit leaders ensure the proper planning and preparation go into the conduct of the ambush. They are then on the ground to command and control execution.
- As in any operation, security is paramount. Ambush forces must focus on security for their own survival and to set the conditions to achieve their mission. In terms of security, ambush forces are especially vulnerable on their flanks and to their rear. There are many actions that can assist in improving security for ambush forces. These include:
- Deploying your recon and surveillance assets and personnel.
- Being ruthless on noise and light discipline.
- Having a plan and knowing the plan to withdraw when and if necessary.
- Employing effective camouflage and concealment.
- You can’t get too complex in your planning of the ambush. A complex ambush plan does not set the conditions for a successful mission. Consequently, simplicity in planning is a must. As in any plan, it must be clear and concise. Each element conducting the ambush must completely understand their purpose and task. The KISS Principle must be adhered to.
The Initiation of an Ambush
Classifying Ambushes
In the realm of ambushes, there are seemingly endless variations. In order to clarify things a bit we try to classify ambushes. We use three specific areas to assist in this classification. These are categories, types, and formations. Below we discuss each of these areas.
Ambush Categories
We place ambushes in two categories. These are hasty and deliberate. Just like any attack, the differences lie in time available for planning and preparation. We’ll discuss both below:

- Hasty Ambush – A hasty ambush is an opportunity that presents itself and must be acted upon immediately. Normally, a unit will be conducting a patrol or reconnaissance and the opportunity to conduct an ambush becomes possible. Additionally, intelligence may arrive to the unit which also requires immediate execution of the ambush. The unit must determine if the reward outweighs the risk in executing the ambush. The risks are there because the unit may not have a lot of information available on the target, will have little planning time, and will have little time to prepare and get the elements in place to conduct the ambush. With this in mind, you can see that much can go wrong. You can also see that conducting a hasty ambush is not a mission for an untrained unit. A solid unit will be trained on executing a hasty ambush.
- Deliberate Ambush – The deliberate ambush is the antithesis of the hasty ambush. In a deliberate ambush, we will normally have pretty good intelligence. This intelligence enables you to conduct quality planning and preparation in order to set the conditions to execute the ambush. The decision to conduct a deliberate ambush means you are feeling pretty confident in your ability to achieve success in the purpose of the ambush. Intelligence and information on the enemy are vital in preparing for a deliberate ambush. You will want to know things such as:
- Size and composition of the enemy you want to ambush.
- The weapons and equipment he possesses.
- His planned route and direction of movement.
- The time frame in which he will arrive at potential ambush points.
We will discuss each of these in far more detail.
Ambush Types
Point vs. Area Ambush
 Ambushes come in two types. They are either point ambushes or area ambushes. More information on each follows:
- Point Ambush – As the name suggests, a point ambush is conducted in one specific area or killing zone. Consequently, you will strive to select that location which enables you achieve your primary objective. Terrain selection is critical in conducting the point ambush.
- Area Ambush – In an area ambush, you are conducting at least two or more point ambushes in a location. These ambushes are normally simultaneous, but can be sequential.  The area ambush is normally more complex to execute because there are normally more moving pieces.
Area Ambush
The graphic above displays the central ambush and three smaller point ambushes. With four ambushes planned (simultaneously or sequentially), you can understand the need for synchronization and discipline.
Ambush Formations
A leader has many formations at his disposal in the conduct of the ambush. In determining which formation will best assist him in achieving his purpose; he must analyze the factors of METT-TC (a concept we have addressed throughout the series). As a friendly reminder, this stands for:
M – Mission
E – Enemy
T – Terrain and Weather
T – Troops Available
T – Time Available
C – Civil Considerations
After this analysis, you can then determine the formation. Below we will discuss the principle formations available.
Linear or Line Ambush
Linear (or Line) – A linear ambush places both its’ assault and support elements on line, parallel to the kill zone.  This usually provides a fairly lengthy kill zone with fires being directed at the flanks of the enemy. Obviously, you want to get as much of the enemy as possible in the kill zone prior to firing the first round. Fire too early or too late and the availability of targets are diminished. Additionally, a well-disciplined enemy will utilize dispersion in his maneuver. Dispersed vehicles again, limit the availability of targets in the linear ambush.  A linear ambush is usually easier to execute and command and control than other formations.
Let’s discuss the graphic above.
Kill Zone – As the name suggests, it is roughly a parallel line. Again, the more distance from start to end– the better. That means more targets if things go as planned.
Protective Obstacles – These are emplaced between the kill zone and the assault force. These obstacles provide security for the assault force. They also assist in providing the assault force time when they displace. These obstacles can range from wire (shown on the graphic) to minefields. As always, once obstacles are emplaced you ensure friendly forces know where they are so they do not run into them. There are few things worse than having to breach friendly obstacles. The one thing that is worse is suffering casualties to a friendly obstacle.
Ambush Forces – The graphic highlights the locations for the assault, security, and support elements. Please refer to our terminology discussion earlier to review the roles of these elements.
Rally Point – Behind the assault/support forces is the rally point. This should be a easily identified piece of terrain where forces can link-up before departing the overall ambush site. If the ambush is conducted in limited visibility; you may have forces placed at the rally point to aid in link-up.
 L-shaped ambush
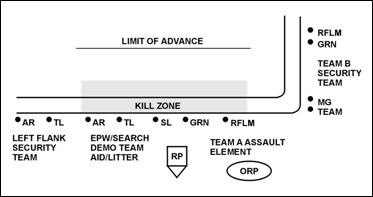
L-Shaped – As the graphic depicts, ambush forces form an L during execution. The assault element forms the long leg parallel to the enemy’s direction of movement along the kill zone. The support element forms the short leg at one end of and at a right angle to the assault element. This provides both flanking (long leg) and enfilading (short leg) fires against the enemy.  Of course, the L-Shaped formation is highly dependent on the right piece of terrain. That right piece of terrain should contain a sharp bend to it. If you are ambushing mechanized forces; you are looking for a sharp turn in a road. If you are ambushing light forces; you are seeking the same bend in a trail or even a swallow stream. In executing the L-Shaped formation, you must ensure all forces understand the direct fire control measures. As the graphic alludes to, it can be very easy for your assault elements to fire into the security element and vice versa. Forces must know where friendly forces are located at all times.
Let’s address the above graphic:
Short Leg – The support element positions itself here along with a small security team. Remember, the support element sets the conditions for the assault force. Usually, this will require them to fix forces in their area. This should make it difficult for enemy forces to withdraw and keep them in the kill zone.
Long Leg – The assault element is positioned to inflict as much destruction as possible in the kill zone. To assist them, a security team has been positioned on the flank. Additionally, their medical and demo assets and forces to aid with enemy prisoners of war.
ORP – This has been placed to assist in placing assets and to aid in the withdrawal of forces.
RP – The Release Point (RP) is located for forces to move into their positions prior to the execution of the ambush.  It may also be utilized in the withdrawal.
Limit of Advance – In this example, friendly forces have established a limit of advance. This is in place in case forces conduct an assault following the ambush.
L-Shaped Ambush
V-Shaped
 V-Shaped Ambush — This formation is not as utilized as the linear or L, but when it is executed it can produce devastating results. In the V (see above diagram), the assault elements are positioned on the flanks of the kill zone thus, forming the V. This formation should enable the assault force to shoot interlocking fires into the kill zone. With friendly fires dispersed and the angles of fire a little more extreme than other formations; this can lead to fratricide potential without good command and control and discipline. Again, the perfect piece of terrain is needed to execute the V. If it is found, the enemy will subject to massive amounts of fire at various angles.
 
Other Formations X and Z
REVIEW
Our goal in this article was to provide you the basics on the ambush. We hope we provided you an understanding of this operation so we can get into far more detail in the future. The ambush can have a powerful effect on the enemy. Although this effect will have the biggest impact on smaller units; it can also have a dramatic effect on larger units. The execution of an ambush seems like it is pretty cut and tried. However, it has far more pieces to it than many imagine. As always, quality planning and preparation set the conditions for execution.
NEXT MONTH
With the conditions set, we will delve into the planning, preparation and execution of the ambush in our next article. We will dissect the keys in successful planning of the ambush. We will address what the critical preparation actions are to set the conditions to conduct the ambush. Finally, we will focus on the execution phase of the ambush. Lot to cover next month – see you then.
 
This article has several errors which include repeated words, misspelled words, missing words, disorganized phrases, and misused punctuation marks such as apostrophes. These mistakes are in addition to the false information you used in one of your daily quiz questions, claiming that the M48 and T54-55 tanks were used in WWII. If you want to be credible, you should hire writers that can do their job without making so many errors and know history well enough to know when specific vehicles/weapons were used. As it is, I can plainly see that you have neither.
Warren Osborn, It’s not a literary piece you chump. Have some appreciation, you leech, for the effort others put into helping the community.
But he’s right though. The only community an article like this helps are.. oh the armchair generals.
Carry on.
Good article thanks